
- SAP Community
- Products and Technology
- Technology
- Technology Blogs by SAP
- Getting started with Microsoft Office Web Apps and...
Technology Blogs by SAP
Learn how to extend and personalize SAP applications. Follow the SAP technology blog for insights into SAP BTP, ABAP, SAP Analytics Cloud, SAP HANA, and more.
Turn on suggestions
Auto-suggest helps you quickly narrow down your search results by suggesting possible matches as you type.
Showing results for
Former Member
Options
- Subscribe to RSS Feed
- Mark as New
- Mark as Read
- Bookmark
- Subscribe
- Printer Friendly Page
- Report Inappropriate Content
06-03-2013
9:57 PM
Remember my last post about introducing Office Web Apps? You might have also read about one million Office 365 licenses being sold?. Just imaging you could tap into this and enrich the Office integration with data coming from SAP!
Like mentioned before my main goal of this blog is to get you started. As a result you should have an app running in Outlook that will show you detailed product information on products that are mentioned in an email that is sent to you.Without the need to leave Outlook.
No matter if you are a SAP guy wanting to embrace Microsoft technologies, or if you are a Microsoft guy who wants to enrich Microsoft applications with SAP data -- I want to make sure that you can follow these examples even if you work with SAP or Microsoft for the first time.
One last thing before we get started... This blog grew and grew... But instead of having a whitepaper, I still want to keep this as a blog since I guess I will have to update it frequently. You probably also know that I like to do a lot of screenshots -- so again apologies for the length of the blog, but I really hope it makes it easier to follow!
OK, the first thing that we have to do is create and register a user both at the SAP Community Network Developer Center and Office 365 Developer Site to have an SAP NetWeaver Gateway OData feed that we afterwards can consume in our Outlook running on Office 365.
Starting with Office 365 Developer Site
It is quite simple to setup and register for an Office 365 Developer 30 day Trial account. Just go to http://msdn.microsoft.com/library/office/apps/fp179924 and follow the steps outlined there:

Click on "Try it free" and enter all relevant fields:

The settings under User-ID (not shown in the screenshot above) will determine how you access your Office 365 Portal later on (e.g. in my case the username SAPMSFTTest@sapmsft.onmicrosoft.com will end up with a SharePoint Online URL: https://sapmsft.sharepoint.com)
When you click on "Create My Account" you should soon after get a confirmation email and should also be able to access the Office 365 admin center.

Great! Now we are also ready to open our new account via Outlook Web Access (just click on Outlook at the top [you might have to refresh the page in order to enable the Outlook link] or go to https://outlook.office365.com and log in with the user you just created, in my case SAPMSFTTest@sapmsft.onmicrosoft.com). This is the place which we want to extend to display data from SAP

Before we continue: In addition to the steps outlined above I can only recommend that you take a close look at what you can all do with this Office 365 Developer Pack. There are A LOT of things that you can do with this 30 day trial -- just play around.
Developer Center
Since you are probably reading this blog on SCN anyway I only quickly want to outline the steps that are required to register and consume a sample OData feed. The place where we want to end-up is here: http://scn.sap.com/community/developer-center/netweaver-gateway
We want to be able to consume the this OData URL for which we need a username and password (actually you can do much, much more with these credentials. For example you can also create your very own OData feed. There are lots of great tutorials available in the Developer Center which I can definitely recommend). Getting these credentials is quite simple.
At first we need to register on SCN.
Go to the URL above (the NetWeaver Gateway Developer Center) and click on Register in the top to create a user for the SCN (I am just using the Email address that I created for my Office 365 account):

After entering the relevant data an email will be sent to activate the account:

and we will get the activation email in Outlook:

Just click on the link to finalize the registration.

Now we can Sign-up for the SAP NetWeaver Gateway Service Consumption .

Just click on the sign-up form https://supsignformssapicl.hana.ondemand.com/SUPSignForms and finish the registration

Perfect. Now we can consume this OData feed for example in IE9 (you might have to add the suffix ?format=xml to render the results correctly)
https://sapes1.sapdevcenter.com/sap/opu/odata/IWBEP/GWDEMO/ProductCollection?format=xml

Again before we continue, I want to highlight (similar to the Office 365 Developer Pack) that you can do A LOT of things with this SAP NetWeaver Gateway Developer center. There is much, much more to it, than this simple access to an OData URL. Just browse and experience the Developer Center yourself.
Lets get started
We are all set. In our Office 365 admin center click on Build Apps (or go directly to the SharePoint site that was created when we signed up for the Office 365 trial, in my case: https://sapmsft.sharepoint.com)
In our Office 365 admin center click on Build Apps (or go directly to the SharePoint site that was created when we signed up for the Office 365 trial, in my case: https://sapmsft.sharepoint.com)

From this site click again on "Build an App" and install the "“Napa” Office 365 Development Tools" by clicking on "Add it"

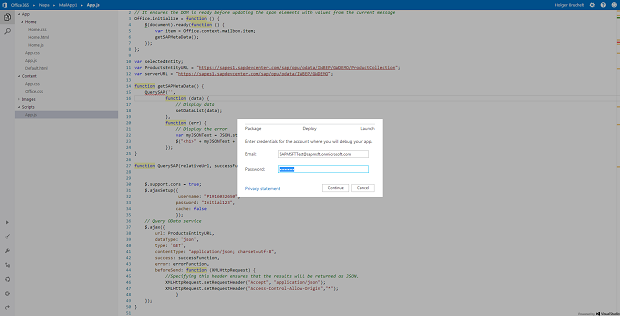
You might have to -- like in my case -- provide your credentials again and click on "Next" several times...


... but after some more clicks and confirmations we are finally done and have Napa available:

Let's click on it.
NAPA is a Browser based development environment that lets you create Office Web Apps without having to install Visual Studio. Of course -- if you have Visual Studio installed -- you can also "transfer" your NAPA project in Visual Studio and continue from there, but for our example here, we will only use the browser based scenario.

I had shown you a few possible Web apps -- and you can see that there are some "app templates" available. We will concentrate on Outlook for now.
So select the "Mail app for Office" and click on Create.

Now we have our NAPA Project open. If I simply click on "Run"

and re-enter my credentials:

I can launch the app:

and Outlook Web Access will open

(If you get an error

just try again. Several times if you have to. It should work...)
The interesting, new thing: we do have a MailApp1 icon available now. When we click on it you see the default / sample app:

So now it is time to change this app with our code. As mentioned in the beginning we want to look for a product name in the body of an email and then look up the product information from an OData feed coming from our SAP NetWeaver Gateway system.
The first thing that we have to do is adjust the "Activation Rule". For this click on the Property tool icon
Then go to the Activation Rules and select the checkbox "The item's body matches a regular expression".
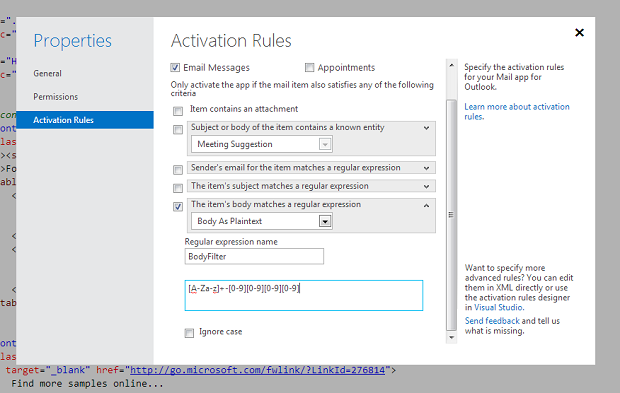
If you remember the OData feed (https://sapes1.sapdevcenter.com/sap/opu/odata/IWBEP/GWDEMO/ProductCollection) from the very beginning you could see that the products that are returned always look like this <Letter<Letter>-<Digit><Digit><Digit><Digit>, e.g.
<d:ProductID>HT-1000</d:ProductID>
<d:ProductID>HT-1001</d:ProductID>
<d:ProductID>HT-1083</d:ProductID>
So in this -- very simple -- example we can use a regular expression that looks like this:
[A-Za-z]+-[0-9][0-9][0-9][0-9]
Which means one or more characters, then a "-" and finally 4 digits.
So just add this regular expression unde the BodyFilter box.
(for more information see http://msdn.microsoft.com/en-us/library/fp142135.aspx)
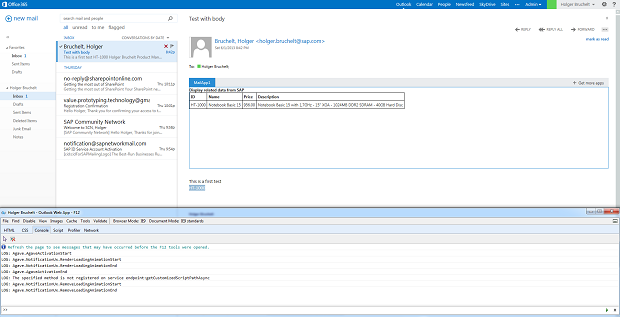
That's all that is required. From now on the App will only be started, if this string is found in the body of our email. We can easily test this. Just start the Office app again. The app, that we had previously seen is gone. However, if I send an email with the text HT-1000 in the body (which matches our regular expression), I can see the app:
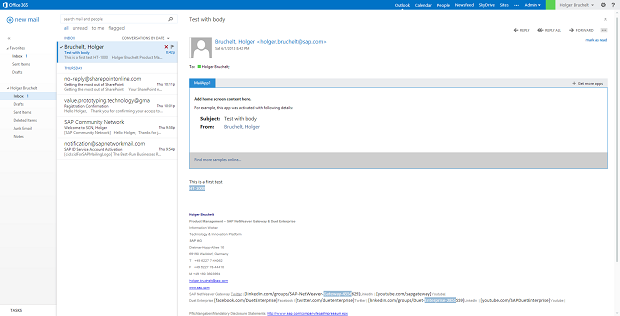
Of course the content of the App is still the same, but at least we now know that it got activated.
So the next step is to take the results of the regular "expression match" and query for this information in the OData feed. I mentioned in my last blog that I am by far not a professional developer. So a lot of credit goes to my friend from Microsoft Joyanta Sen who really got me started on this.
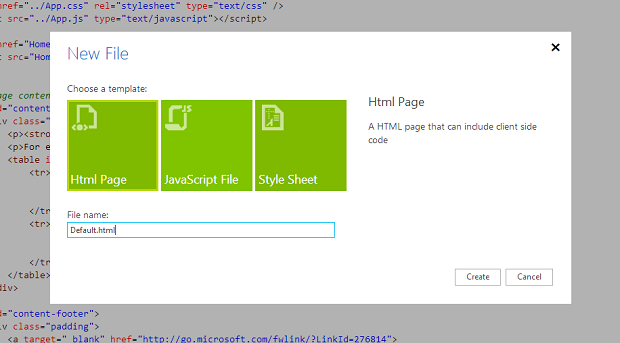
At first we will create a new Start Page (in order to have a fall-back... just in case). For this I right-click on App and select "Add New Item"
I will just leave everything as it is and create the Default.html file
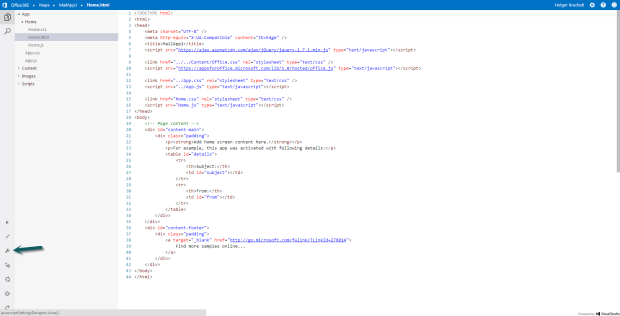
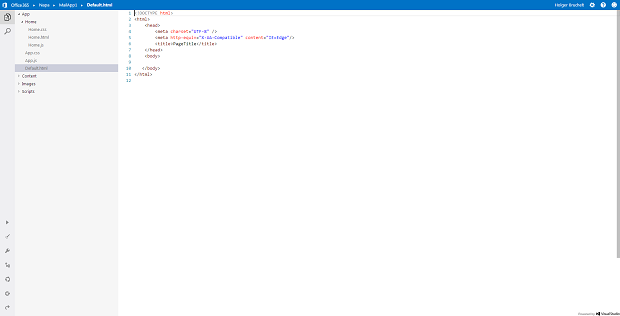
Now I just insert the following code:
<!DOCTYPE html>
<html>
<head>
<meta charset="UTF-8" />
<meta http-equiv="X-UA-Compatible" content="IE=Edge" />
<title>MailAppSAPSample</title>
<link rel="stylesheet" type="text/css" href="../Content/Office.css" />
<!-- Add your CSS styles to the following file -->
<link rel="stylesheet" type="text/css" href="../Content/App.css" />
<script src="https://ajax.aspnetcdn.com/ajax/jQuery/jquery-1.7.1.min.js"></script>
<script src="https://appsforoffice.microsoft.com/lib/1.0/hosted/office.js"></script>
<!-- Add your JavaScript to the following file -->
<script src="../Scripts/App.js"></script>
</head>
<body>
<!-- Replace the following with your content -->
<div id="Content">
<strong>Display related data from SAP</strong>
<!-- Container -->
<div id="metadataContainer" style="width:100%; cursor:pointer; height: 150px;overflow:auto;"></div>
<!-- Errors -->
<div id="errorDiv"></div>
</div>
</body>
</html>
Nothing fancy or complicated. Here just a few explanations
- Line 13: Apps.css -- this will be a very simple CSS that is not yet created
- Line 16: Reference to the jquery JavaScript that we will use to connect to the OData feed
- Line 20: The Java script file that contains all the logic to retrieve and work with the data
- Line 27: metadataContainer which we will leverage to put the results.
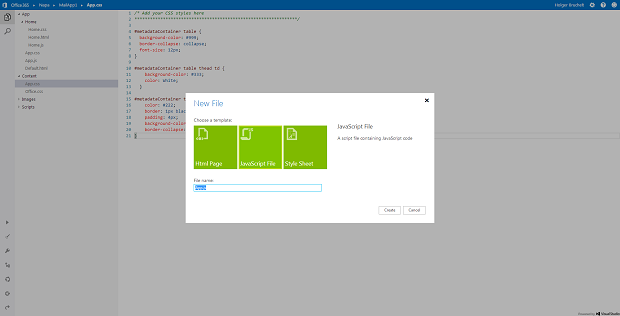
So the next thing is to create the Apps.css. Again right click -- this time on the Content folder, click on "Add new files" and create an App.css file:
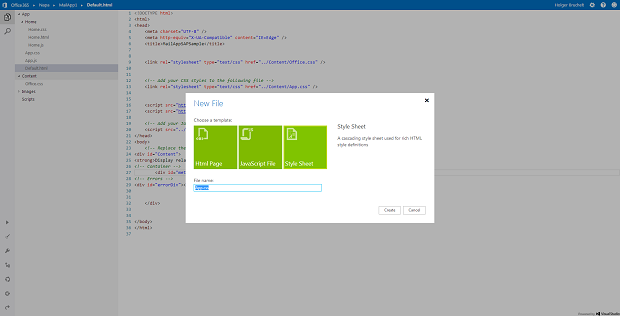
Then copy the following code snipped:
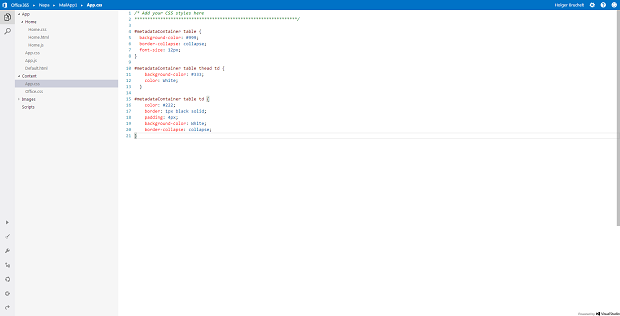
/* Add your CSS styles here
***************************************************************/
#metadataContainer table {
background-color: #999;
border-collapse: collapse;
font-size: 12px;
}
#metadataContainer table thead td {
background-color: #333;
color: White;
}
#metadataContainer table td {
color: #222;
border: 1px black solid;
padding: 4px;
background-color: White;
border-collapse: collapse;
}
Now lets come to the most interesting thing: the App.js. On the Scripts folder, right click and again create a new file. This time an App.js file:
The code that we will add is a little more complicated:
// This function is run when the app is ready to start interacting with the host application
// It ensures the DOM is ready before updating the span elements with values from the current message
Office.initialize = function () {
$(document).ready(function () {
var item = Office.context.mailbox.item;
getSAPMetaData();
});
};
var selectedEntity;
var ProductsEntityURL = "https://sapes1.sapdevcenter.com/sap/opu/odata/
IWBEP/GWDEMO/ProductCollection";
var serverURL = "https://sapes1.sapdevcenter.com/sap/opu/odata/IWBEP/GWDEMO";
function getSAPMetaData() {
QuerySAP('',
function (data) {
// Display data
setDataList(data);
},
function (err) {
// Display the error
var myJSONText = JSON.stringify(err);
$("<h1>" + myJSONText + "</h1>").appendTo("#errorDiv");
});
}
function QuerySAP(relativeUrl, successFunction, errorFunction) {
$.support.cors = true;
$.ajaxSetup({
username: "<replace with your user>",
password: "<replace with your password>",
cache: false
});
// Query OData service
$.ajax({
url: ProductsEntityURL,
dataType: 'json',
type: 'GET',
contentType: "application/json; charset=utf-8",
success: successFunction,
error: errorFunction,
beforeSend: function (XMLHttpRequest) {
//Specifying this header ensures that the results will be returned as JSON.
XMLHttpRequest.setRequestHeader("Accept", "application/json");
XMLHttpRequest.setRequestHeader("Access-Control-Allow-Origin","*");
}
});
}
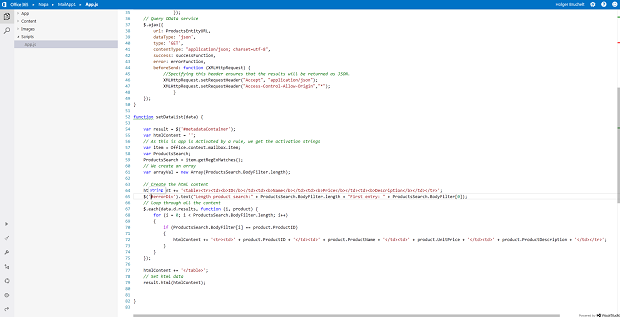
function setDataList(data) {
var result = $('#metadataContainer');
var htmlContent = '';
// As this is app is Activated by a rule, we get the activation strings
var item = Office.context.mailbox.item;
var ProductsSearch;
ProductsSearch = item.getRegExMatches();
// We create an array
var arrayVal = new Array(ProductsSearch.BodyFilter.length);
// Create the html content
htmlContent += '<table><tr><td><b>ID</b></td><td><b>Name</b></td><td><b>Price</b></td><td><b>Description</b></td></tr>';
// loop through all the content
$.each(data.d.results, function (i, product) {
for (i = 0; i < ProductsSearch.BodyFilter.length; i++)
{
if (ProductsSearch.BodyFilter[i] == product.ProductID)
{
htmlContent += '<tr><td>' + product.ProductID + '</td><td>' + product.ProductName + '</td><td>' + product.UnitPrice + '</td><td>' + product.ProductDescription + '</td></tr>';
}
}
});
htmlContent += '</table>';
// Set html data
result.html(htmlContent);
}
Let me again highlight a few paragraphs (see also http://msdn.microsoft.com/en-us/magazine/jj991976.aspx for additional information):
The first few lines initialize the app and call the getSAPMetaData function.
In this function we call the QuerySAP function and try to set the data to the container.
In the QuerySAP we use jQuery, set the username and password (don't forget to replace my placeholders with your SCN username and password, e.g. username: P1916032xxx) and call the URL to the ProductsEntityURL which we specified in line 11.
Finally in setDataList (Line 52) we take the match from the regular expression (Line 59: item.getRegExMatches(); )
Then we create a new table (Line 68) and loop over the results of the OData query (data.d.results). If the ProductID of the regular expression matches the Product ID from the OData feed, then we create a new row for our table containing additional values of the product.
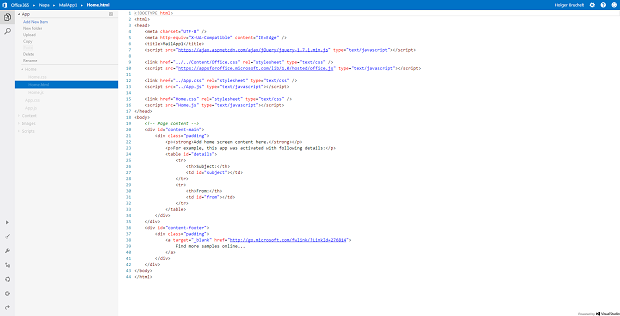
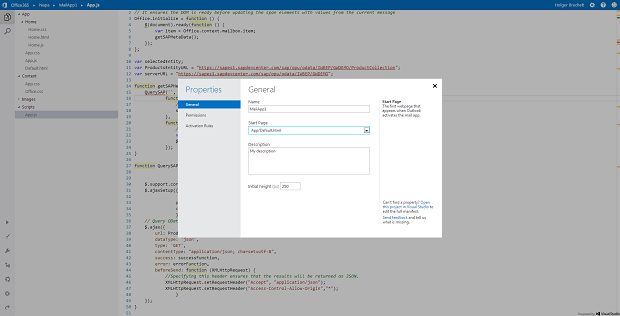
That's (almost) it. Now we have to make sure that the Default.html is used when a user clicks on the App. So click again on the properties and change the Start page to "App/Default.html"
Before we continue and test the app, let me highlight a few other things. First of all -- as you can see -- we are using basic authentication for this service. Obviously in this test / trial landscape we cannot configure Single Sign On. Via Duet Enterprise it would have been fairly simple to get SSO working, but unfortunately we do not have a fitting trial version available.
The other thing is in Line 30 ($.support.cors = true;). As you will also see later on, it is not so easy to get the Cross-Origin Resource Sharing (http://de.wikipedia.org/wiki/Cross-Origin_Resource_Sharing) working. In our example we are retrieving information from multiple domains which is prevented usually due to security reasons. So in our case we have to perform some workarounds.
But enough talk... Lets click on run.
If you click on the email from before (with the activated MailApp)
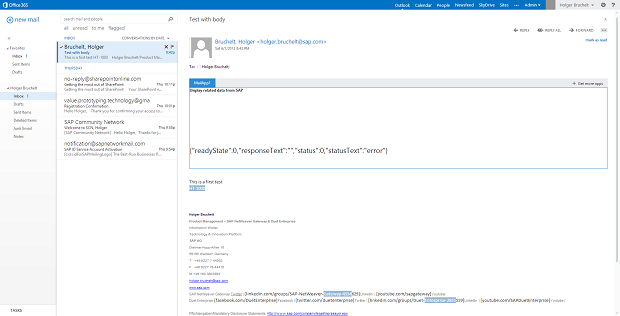
you might very well get a result like seen above. You can see the text "Display related data from SAP" (which we entered in Default.html -- so it is already picking up the required file), but we can also see an error message like this: {"readyState":0,"responseText":"","status":0,"statusText":"error"}
(sometimes no error is displayed at all)
The best way to analyze this is to run (in my case from IE) the "F12 tool" (just click F12 from within IE to start a nice analysis and debugging tool; from there a lot of useful information can be found in the console tab).
or to add some debug information, e.g.
$('#errorDiv').text("Length product search:" + ProductsSearch.BodyFilter.length + "First entry: " + ProductsSearch.BodyFilter[0];
which can reveal some very helpful information as well.
What you might have to do is to trust the relevant sites in IE and to enable "Access data sources across domains".
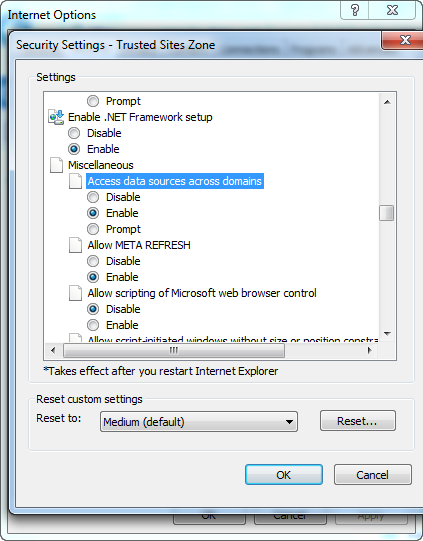
The sites that I needed to define as trusted sites are:
https://outlook.office365.com
https://*.sharepoint.com
https://*.outlook.com
https://*.microsoftonline.com
https://*.sapdevcenter.com
Now you should hopefully be able to see the results from SAP in the Outlook application (if you get an error saying that the Application could not get started -- just click on Retry).
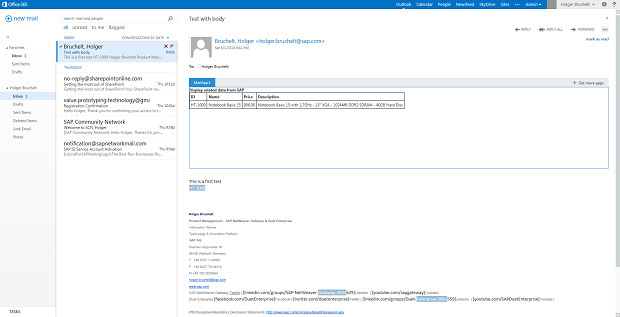
If this is not working, then most likely you have a Cross origin resource sharing issue. So make sure that you doublecheck the IE configuration settings (actually, I am repeating IE here, because I was not able to get this sample working in Firefox or Chrome. -- Let me know if you find a way). Obviously this would not be a configuration that we would use in a productive environment, but for a simple getting started / development test, this should be fine.
When you have the results displayed you can see all matching regular expressions (e.g. if you took a close look at the debug screen before you might have noticed that I had 3 matches for the regular expression. That is because in the lower part of my email I had some texts like linkedin.com/groups/Duet-Enterprise-2851559 which were also a match for our regular expression, but obviously didn't result in any OData match).
Summary
I hope you got a good first impression of how easy it is to integrate SAP data with the new Office Web App model from Microsoft. If you look back, all that is required is a browser, a good OData feed exposed via SAP NetWeaver Gateway and some HTML and JavaScript know-how.
I can only encourage you to try out some apps yourself. Everything that you need is available online and can be accessed by registering as shown in the beginning. Maybe you can build the other Outlook app that I mentioned before that looks up additional information in the SAP system depending on the senders email address?
We will also create some whitepapers that explain in much more detail how to integrate in other Office Web Apps so that you can also work on these scenarios.
Update: the first whitepaper which talks about a vendor address integration in Word 2013 is now available here
Please feel free to comment and ask questions.
- SAP Managed Tags:
- SAP BusinessObjects Business Intelligence platform,
- Duet Enterprise,
- SAP Gateway
6 Comments
You must be a registered user to add a comment. If you've already registered, sign in. Otherwise, register and sign in.
Labels in this area
-
ABAP CDS Views - CDC (Change Data Capture)
2 -
AI
1 -
Analyze Workload Data
1 -
BTP
1 -
Business and IT Integration
2 -
Business application stu
1 -
Business Technology Platform
1 -
Business Trends
1,661 -
Business Trends
88 -
CAP
1 -
cf
1 -
Cloud Foundry
1 -
Confluent
1 -
Customer COE Basics and Fundamentals
1 -
Customer COE Latest and Greatest
3 -
Customer Data Browser app
1 -
Data Analysis Tool
1 -
data migration
1 -
data transfer
1 -
Datasphere
2 -
Event Information
1,400 -
Event Information
65 -
Expert
1 -
Expert Insights
178 -
Expert Insights
282 -
General
1 -
Google cloud
1 -
Google Next'24
1 -
Kafka
1 -
Life at SAP
784 -
Life at SAP
11 -
Migrate your Data App
1 -
MTA
1 -
Network Performance Analysis
1 -
NodeJS
1 -
PDF
1 -
POC
1 -
Product Updates
4,577 -
Product Updates
330 -
Replication Flow
1 -
RisewithSAP
1 -
SAP BTP
1 -
SAP BTP Cloud Foundry
1 -
SAP Cloud ALM
1 -
SAP Cloud Application Programming Model
1 -
SAP Datasphere
2 -
SAP S4HANA Cloud
1 -
SAP S4HANA Migration Cockpit
1 -
Technology Updates
6,886 -
Technology Updates
408 -
Workload Fluctuations
1
Related Content
- It has never been easier to print from SAP with Microsoft Universal Print in Technology Blogs by Members
- MYINBOX is connected to HUB system and workflow exists in ECC system in Technology Q&A
- API_PHYSICAL_INVENTORY_DOC_SRV batch in Technology Q&A
- SharePoint Lists into DataSphere in Technology Blogs by Members
- Hello experts, require your help with a Solution Manager 7.2 ABAP/JAVA Migration to new server in Technology Q&A
Top kudoed authors
| User | Count |
|---|---|
| 13 | |
| 11 | |
| 11 | |
| 10 | |
| 9 | |
| 7 | |
| 6 | |
| 5 | |
| 5 | |
| 5 |