- SAP Community
- Products and Technology
- Financial Management
- Financial Management Blogs by Members
- Install SAP BusinessObjects Planning and Consolida...
- Subscribe to RSS Feed
- Mark as New
- Mark as Read
- Bookmark
- Subscribe
- Printer Friendly Page
- Report Inappropriate Content
Purpose
The posting describes the steps to Install SAP BusinessObjects Planning and Consolidation (BPC) 7.5 . The installation will be done in two servers, a database server and SAP BPC server which will have application server/web server component for SAP BPC.
I have used SAP BPC documentation however it took me sometime to complete the installation successfully so I wrote the instructions below based in my experience
1. Build a Database Server
1.1 Install windows 2008 R2 64 bit and install the latest service pack/updates
1.2 Install SQL 2008 R2 Enterprise edition 64bit for production environment or developer edition for test environment
- Create Active directory account will be used to run SQL server Services (Company\dbuser_xxxx) where xxxx are the suffix of the server name for example Company-devdb3 should use dbuser_devdb3
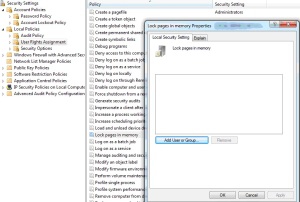
- Grant the dbuser_xxxx right to lock pages in memory as below
- Start SQL 2008 R2 setup program >> Installation >> New installation or add to an existing installation
- Setup support Rules from will showup so Click OK
- Enter Product key then Click Next
- Check I accept License Terms >> Click Next
- Setup support files form will showup >> Click Install
- Click Next>> Select Server feature installation then Click Next
- Select the following features:
- Database Engine services
- Full-Text Search
- Analysis services
- Reporting Services
- Business Intelligence development studio
- Client Tools connectivity
- Integration services
- Client tool backwards compatibility
- Management Tool – Basic

- Click Next >> Click Next
- Specify the Instance ID >> Click Next >> Click Next
- Click Use the same account for all SQL server services and enter AD user/password created earlier
- Set SQL Server Agent Startup type to Automatic
- Click Next
- In Database engine configuration specify SQL server administrator >> Click Add and select the AD group will administer database engine >> Select Mixed mode and Sa password >> Click Next
- In Analysis service configuration specify users have administrative permission Analysis service >> Click Add and select the AD group will administer Analysis service >> Click Next
- Click Next >> Click Next >> Click Next >> Click Next
- Click Install ( installation will take around 20 minutes)
- Install the latest SQL service pack/updates
2. Install SAP BusinessObjects Planning and Consolidation (BPC)
SAP BPC application/web server are in the same server 2.1 Install windows 2008 R2 64 bit and install the latest service pack/updates2.2 Prerequisites:- Install SQL 2008 R2 Shared features:
- Business Intelligence development studio
- Client Tools connectivity
- Integration services
- Client tool backwards compatibility
- Management Tool – Basic
- Install MSXML 4.0 SP2 or later
- Install ADOMD.NET 9.0
- Install Microsoft Report Viewer 2008 SP1
- Install Microsoft SQL Server 2005 backward compatibility
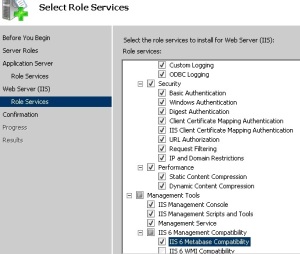
- Install .Net FrameWork 3.5 and IIS:

- Install the Anti-Cross Site Scripting Library:
2.4 Install SAP BPC
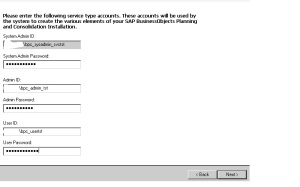
- Create System Admin ID AD account something LikeBPC_sysadmin_svcTst for Development environment, add it local administrators group in the BPC server(application/Web server), grant it sysadmin role to MS SQL Server, add to administrator role on analysis services(OLAP), grant it admin access to reporting services home folder(Browser, Content Manager, My Reports, OutlookSoft Report Viewer, Publisher, Report Builder)
- Create Admin ID AD account something Like BPC_dmin_Tst for Development environment, add it local Power users group in the BPC server(application/Web server), grant it public role to MS SQL Server,
- Create User ID something Like BPC_user_Tst for Development environment, grant it public role to MS SQL Server.
2.5 Required Post-Installation Steps
- Log on with a domain user ID (System Admin ID created in 2.2.3) to the server where you are installing SAP BPC server.
- Download BPC Setup to local disk
- Launch startup from BPC setup folder
- Click Install Server on SQL 2008
- Click Next >> accept the license agreement then Click Next
- Select Custom Multi-server >> Set SLD in System ID >> Click Next
- Select Microsoft Windows in authentication method>> Click Next
- Set Services accounts >> Click Next
- Enter the required server info, set SQL Server name, OLAP, Insight OLAP and reporting services to the database server name prepared in step 2.1. set Local data path to C:\BPC_MS\Data >> Click Next >>
- Enter the path and file name for anti-cross site scripting Library, set it to C:\BPC_MS\Library\AntiXSSLibrary.dll >> Click Next
- Set Program Path to C:\BPC_MS >> Click Next
- The installer will start install SAP BPC and will take around 20 minutes
- Config XMLA to use dedicated IIS application with 32 bit enabled
- Add application Pool>> set the name to BPC_XMLA>> Set Enable 32-bit application to True
- Navigate to Sites >> Default Web site >> OSoft >> Advanced Settings >> set application pool to BPC_APP and Click OK
- Navigate to Sites >> Default Web site >> XMLA >> Advanced Settings >> set application pool to BPC_XMLA and Click OK
- Removing Default Access to the BPC Management Console(http://servername/ManagementConsole), by default every user in Active directory have access so we want limit access BPC administer
- Create Local group in BPC server, the name of the group name should beBPC_ManagementConsole
- Add AD users or group you want grant access to the BPC management console to BPC_ManagementConsole local group in the server
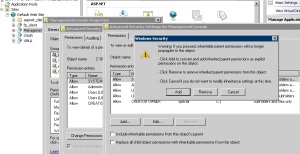
- Remove inherited permissions from managementConsole folder , Open IIS manager >> Default Website >> ManagementConsole >> Right Click >> Edit Permissions>> Security >> Advanced >> Change Permission >> uncheck Include inheritable permissions from this object’s parent>> Click Add >> Click OK >> Click OK >> Click OK

- Grant Management Console IIS Identity pool access to ManagementConsole Folder. Open IIS manager >> Default Website >> ManagementConsole >> Right Click >> Edit Permissions>> Security >> Edit>> Add “IIS AppPool\BPC_ManagementAP” >> Click OK >> Click OK >> Click OK If you don’t grant the Management console pool you get error message when you access it throw http://BPCServerName/ManagementConsole
- Remove the group shouldn’t have access management Console, Open IIS manager >> Default Website >> ManagementConsole >> Right Click >> Edit Permissions>> Security >> Edit >> Select Users >>Click remove >> Click Add>> add BPC_ManagementConsole local group >> Click OK >> Click >> Click OK
- Setting Up ODBC Logging in IIS for the Default Web Site
- Create a Microsoft SQL Server user to access AppServer as the default database. Grant it db_Owner database role on AppServer database.
- Create ODBC datasource(BPC_ManagementDSN system DSN) Enter the Microsoft SQL Server user information
- Enable the default website to use ODBCLogging by running Command Prompt as administrator:
appcmd set config -section:ODBCLogging -datasource:BPC_ManagementDSN -tableName:BPCLog -username:BPC_ConsoleUsr -password:Test321
Applied configuration changes to section “system.webServer/odbcLogging” for “MAC
HINE/WEBROOT/APPHOST” at configuration commit path “MACHINE/WEBROOT/APPHOST”
C:\Windows\System32\inetsrv> appcmd set sites “Default Web Site” -logFile.logFormat:Custom -logFile.customLogPluginClsid:{FF16065B-DE82-11CF-BC0A-00AA006111E0}
SITE object “Default Web Site” changed
C:\Windows\System32\inetsrv>
- Set COM+ Object Application Pooling Pool Size
Set the application pooling pool size for the COM+ componentsEverest Update, OSoftSystemConfig, K2Processing, andOsoftDataService as below:
Choose Start Administrative Tools Component Services COM+ applications, Right-click the application, Choose Properties, then on the Pooling & Recycling tab, change the application pool size to 5 - Setting Memory Recycling in the IIS Application Pool
- Start Internet Information Services (IIS) Manager on the Application server.
- Expand the local computer, and expand Application pools.
- Right-click the application pool that contains the Osoft virtual directory (BPC_APP), then select advanced settings.
- From the Recycling, Virtual memory limit (in KB), enter 1843200 (the maximum amount), and then select OK.
- Set 3GB Support for Memory on the COM+ Object
- Open Component Services on the application server.
- Choose the Everest Update component in COM+ Applications tree.
- Open the Properties menu using the right-click menu.
- Open the Advanced tab.
- Select the Enable 3GB support option, then click OK.
Changing this setting is a potential solution if you receive an Out of memory exception error while running logic.
3. Install SAP BPC Language Package
3.1 Download BPC Language Pack from http://service.sap.com/swdc
3.2 Navigate to BPC_LanguagePack on the BPC server, click on “Setup.exe” to start the installation >> Click Next>> accept the license agreement and click on Next >> Click Next>> The installation starts >> The installation is finished.
You must be a registered user to add a comment. If you've already registered, sign in. Otherwise, register and sign in.
-
Assign Missing Authorization Objects
1 -
Bank Reconciliation Accounts
1 -
CLM
1 -
FIN-CS
1 -
Finance
2 -
GRIR
1 -
Group Reporting
1 -
Invoice Printing Lock
2 -
Mapping of Catalog & Group
1 -
Mapping with User Profile
1 -
matching concept and accounting treatment
1 -
Oil & Gas
1 -
Payment Batch Configurations
1 -
Public Cloud
1 -
Revenue Recognition
1 -
review booklet
1 -
SAP BRIM
1 -
SAP CI
1 -
SAP RAR
1 -
SAP S4HANA Cloud
1 -
SAP S4HANA Cloud for Finance
1 -
SAP Treasury Hedge Accounting
1 -
Z Catalog
1 -
Z Group
1
- SAP ECC Conversion to S/4HANA - Focus in CO-PA Costing-Based to Margin Analysis in Financial Management Blogs by SAP
- Understanding the Basic SAP Revenue Accounting and Reporting (RAR) in Financial Management Q&A
- The Reasons to Move to Cloud or Stay On Premise Are the Same - That Makes No Sense To Me in Financial Management Blogs by SAP
- Update about the maintenance timelines for current releases of SAP Business Planning and Consolidation, version for SAP BW/4HANA 2021 in Financial Management Blogs by SAP
- BO Financial Consolidation and FIM migration from Oracle to SQL in Financial Management Q&A

